利用LayoutManager设计表格样式
# 前言
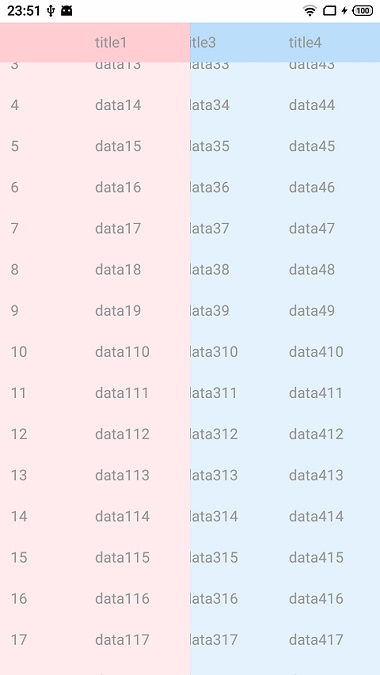
在Excel展示数据时我们经常会使用表头和列头的冻结功能,在数据比较多的情况下观察冻结的窗口就可以很容易的找到当前行和列所在的位置,而在尺寸非常有限的移动设备上如果要达到相同的效果,我们该怎么做呢?
# 传统做法
最容易想到的就是利用多个RecyclerView进行整合,表头和列头重叠的地方使用一个固定的View,冻结用的表头使用HorizontalScrollView,冻结用的列头使用一个RecyclerView,而数据部分则使用一个嵌套在HorizontalScrollView的RecyclerView
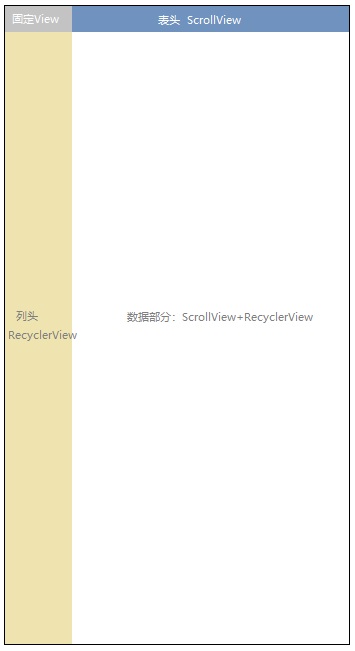
再将列头RecyclerView的上下滑动和数据部分RecyclerView的上下滑动进行绑定,将表头HorizontalScrollView的左右滑动和数据部分HorizontalScrollView的左右滑动进行绑定,就可以实现冻结效果了,为了使用简单,还可以将整个部分封装成一个控件,仅保留数据对接方法就可以复用了。
# LayoutManager做法
这里要介绍一种侵入性不高,且更为简便的做法,只需要一个RecyclerView+一个定制的LayoutManager就可以做到以上效果,该做法的灵感也来自于对LinearLayoutManager的源码分析而演变出来的。
# RecyclerView源码中滑动的实现
直接从RecyclerView的滑动开始看起
    @Override
    public void scrollBy(int x, int y) {
        ...
        // RecyclerView默认只支持纵向或横向一种滑动方式
        final boolean canScrollHorizontal = mLayout.canScrollHorizontally();
        final boolean canScrollVertical = mLayout.canScrollVertically();
        if (canScrollHorizontal || canScrollVertical) {
            scrollByInternal(canScrollHorizontal ? x : 0, canScrollVertical ? y : 0, null);
        }
    }
再往scrollByInternal中查看
    boolean scrollByInternal(int x, int y, MotionEvent ev) {
        ...
        if (mAdapter != null) {
            mReusableIntPair[0] = 0;
            mReusableIntPair[1] = 0;
            // 继续交给scrollStep方法
            scrollStep(x, y, mReusableIntPair);
            consumedX = mReusableIntPair[0];
            consumedY = mReusableIntPair[1];
            unconsumedX = x - consumedX;
            unconsumedY = y - consumedY;
        }
        ...
    }
    void scrollStep(int dx, int dy, @Nullable int[] consumed) {
        ...
        int consumedX = 0;
        int consumedY = 0;
        // 到这里可以看出水平和垂直处理仍然是分开的,如果dy!=0的逻辑放在else if中就很难办了
        if (dx != 0) {
            consumedX = mLayout.scrollHorizontallyBy(dx, mRecycler, mState);
        }
        if (dy != 0) {
            consumedY = mLayout.scrollVerticallyBy(dy, mRecycler, mState);
        }
        ...
    }
进入LinearLayoutManager源码
    public int scrollVerticallyBy(int dy, RecyclerView.Recycler recycler,
            RecyclerView.State state) {
        // 水平方向直接返回0表示不消费,我们需要同时处理水平和垂直两个方向,所以这里的逻辑肯定要重写了
        if (mOrientation == HORIZONTAL) {
            return 0;
        }
        return scrollBy(dy, recycler, state);
    }
水平和垂直的处理都交给了scrollBy
    int scrollBy(int delta, RecyclerView.Recycler recycler, RecyclerView.State state) {
        ...
        // fill方法用于新建行视图,内部会根据需要创建viewHolder并缓存
        final int consumed = mLayoutState.mScrollingOffset
                + fill(recycler, mLayoutState, state, false);
        ...
        // 在可滑动范围内absDelta都会==consumed
        final int scrolled = absDelta > consumed ? layoutDirection * consumed : delta;
        // 重点看下这里,它表明了内部children是如何实现滑动效果的
        mOrientationHelper.offsetChildren(-scrolled);
        if (DEBUG) {
            Log.d(TAG, "scroll req: " + delta + " scrolled: " + scrolled);
        }
        mLayoutState.mLastScrollDelta = scrolled;
        return scrolled;
    }
offsetChildren方法在OrentationHelper类中是个抽象方法,mOrientationHelper成员属性在LinearLayoutManager的setOrientation时被初始化,找到子类,发现设置水平垂直不同方向时offsetChildren实现方法最终分别调用RecyclerView的offsetChildrenHorizontal和offsetChildrenVertical方法
   public void offsetChildrenHorizontal(@Px int dx) {
        final int childCount = mChildHelper.getChildCount();
        for (int i = 0; i < childCount; i++) {
            mChildHelper.getChildAt(i).offsetLeftAndRight(dx);
        }
    }

    public void offsetChildrenVertical(@Px int dy) {
        final int childCount = mChildHelper.getChildCount();
        for (int i = 0; i < childCount; i++) {
            mChildHelper.getChildAt(i).offsetTopAndBottom(dy);
        }
    }
看到这里也就一目了然了,原来最终都是调用的子View的offsetLeftAndRight和offsetTopAndBottom来调整子View的位置来达到滑动偏移的效果
# 利用TranslationX实现左右滑动
首先确定原有LinearLayoutManager的方向为垂直,这样我们只要处理水平的偏移就可以了
    // 覆盖方法,让水平方向也可滑动
    override fun canScrollHorizontally(): Boolean {
        return true
    }
offsetLeftAndRight虽然可以实现左右偏移,但它的偏移是相对于前一次偏移重新计算的,而通过fill方法新建的view前一次偏移却是0,我们需要一个全局的变量来记录当前所有子View的偏移,而view的translationX刚好是忽略上一次偏移,每次都按照新值重新设置的,使用起来更加方便
    // 仿照源码设置每个子View的偏移量
    private fun updateTranslationX() {
        for (i in 0 until childCount) {
            updateItemTranslationX(getChildAt(i))
        }
        updateItemTranslationX(headerView)
    }

    private fun updateItemTranslationX(viewGroup: ViewGroup?) {
        if (viewGroup != null && viewGroup.childCount > 0) {
            // 内部就是每个子View中children的偏移量
            for (index in blockCount until viewGroup.childCount) {
                val child = viewGroup.getChildAt(index)
                child.translationX = currentTranslationX
            }
        }
    }
在除滑动外的其他时机重新设置偏移量:包括页面的滑动与子View的新创建
    // 页面滑动不一定会触发子View的新创建,但必然会触发上面提到的纵向偏移的修改
    override fun offsetChildrenVertical(dy: Int) {
        super.offsetChildrenVertical(dy)
        updateTranslationX()
    }
    // 子View的创建则必然会触发layout方法的回调
    override fun onLayoutChildren(recycler: RecyclerView.Recycler?, state: RecyclerView.State?) {
        super.onLayoutChildren(recycler, state)
        updateTranslationX()
    }
接下来只要监听横向滑动的偏移量并重新就可以达到初步的效果了
    override fun scrollHorizontallyBy(dx: Int, recycler: RecyclerView.Recycler?, state: RecyclerView.State?): Int {
         // 这里需要过滤掉冻结列的水平滑动事件
         if (touchedInScrollableView()) {
            // 收集偏移量
            currentTranslationX -= dx
            // 计算可偏移的范围
            val maxValue = 0f
            val minValue = recyclerView.width - getChildAt(0).width
            if (currentTranslationX > maxValue) {
                currentTranslationX = maxValue
            } else if (curTranslationX < minValue) {
                currentTranslationX = minValue.toFloat()
            }
            // 更新至各个子View
            updateTranslationX()
        }
        return dx
    }
这里touchInScrollableView的判断有稍许麻烦,需要在恰当时机拦截触摸事件,来记录触摸的位置
    recyclerView.addOnItemTouchListener(object : RecyclerView.OnItemTouchListener {
        override fun onInterceptTouchEvent(rv: RecyclerView, e: MotionEvent): Boolean {
            // DOWN事件时记录下触摸位置
            if (e.action == MotionEvent.ACTION_DOWN) {
                lastTouchX = e.x
            }
            return false
        }
    })

    private fun touchedInScrollableView(): Boolean {
        return lastTouchX >= headerView.getChildAt(blockCount).left
                && lastTouchX <= headerView.getChildAt(headerView.childCount - blockCount).right
    }
运行起来发现冻结的列与可滑动的列重叠了,解决办法就是设置冻结列的背景并提高Z轴的高度
但有些小伙伴又要说了,产品要求横向与纵向要单独滑动,不能在一个触摸周期内同时进行。这其实也不难,我们只需要记录下当前一次触摸滑动的方法,再限制住另一个方向的偏移设置就可以了
    override fun onScrollStateChanged(state: Int) {
        super.onScrollStateChanged(state)
        // 记录下当前的滑动状态
        virtualDraggingDirection = when(state) {
            RecyclerView.SCROLL_STATE_IDLE -> Direction.END
            RecyclerView.SCROLL_STATE_DRAGGING -> Direction.START
            else -> virtualDraggingDirection
        }
    }
在scrollVerticallyBy和scrollHorizontallyBy加以控制
    override fun scrollVerticallyBy(
        dy: Int,
        recycler: RecyclerView.Recycler?,
        state: RecyclerView.State?
    ): Int {
        draggedY += dy
        // 判断当前是否是纵向滑动开始
        val dragYStart = (virtualDraggingDirection == Direction.START && abs(draggedY) > touchSlop)
        if (dragYStart || virtualDraggingDirection == VERTICAL) {
            virtualDraggingDirection = VERTICAL
            super.scrollVerticallyBy(dy, recycler, state)
        }
    }

    override fun scrollHorizontallyBy(
        dx: Int,
        recycler: RecyclerView.Recycler?,
        state: RecyclerView.State?
    ): Int {
        draggedX += dx
        // 判断当前是否是横向滑动开始
        val dragXStart = (virtualDraggingDirection == Direction.START && abs(draggingX) > touchSlop)
        if (dragXStart || virtualDraggingDirection == HORIZONTAL) {
            virtualDraggingDirection = HORIZONTAL
            // 下面是原有记录横向滑动的偏移量并重新的代码
            ...
        }
    }
最终效果展示